Live music tracks: how to add metadata in Highlander
This guide explains how to create a Take Data Card and complete metadata for live music tracks in Highlander. See the relevant guidance if you’re uploading or a .
Check if the track already exists
If you are playing a track that was previously performed live, a ‘silent’ Take Data Card (TDC) is likely to have been created for the original session or event. Search to see if a ‘silent’ TDC exists and drag and drop into your playlist.
Remember to remove the word ‘silent’ from the card.
‘Silent’ cards have metadata filled for interactive displays such as Now Playing but do not contain audio.
How to search for TDCs
Click on the search icon in the top menu bar to search all stores in your workgroup.

You can also search specific stores by selecting them and using the filter option on the top menu bar. To select multiple stores use ctrl + click.

Use the wildcard symbol * before and after your search terms to find tracks that include those terms. Without them the system will look for an exact match.
Create a new Take Data Card (TDC)
To create a TDC for the live performance of the track, start by selecting the store you want it to be created in.
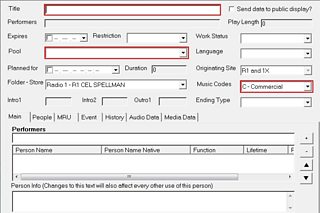
Click on file in the top-left corner and under new select Music-DIGA.

Set the expiry date
Unless told otherwise, you should set the expiry date for 1 week after the event.
1. Title your track
Use the following convention for the title field:
Song Title – ‘Event Group’ – RXDD/MM/YYYY
For example: I Love You - Radio 2 Session – RX 06/05/2013
For details of the titles you should use for particular events, check the list .
Title for public display
Public titles follow this format:
Song Title (Event Group, D Mon YYYY)
For example: I Love You (Radio 2 Session, 6 May 2013)
Get your tracks displayed live
Tick the Send data to public display box to ensure your track is displayed on interactive platforms such as Now Playing.

2. Select your programme
Select your programme from the Pool field.

3. Select the right music code
For the music code field use:
- R for pre-recorded live music sessions or concerts
- L for performances broadcast live
For example you would use L for the first live transmission of a Live Lounge session. For a subsequent transmission played out on the Greg James show, you would use R.
4. Add performers
Click on the + sign on the right-hand side of the performer field.

Check if they are already listed
Use the search function to check if the performer is already in the system.
Use the wildcard symbol * before and after your search terms to find tracks that include those terms. Without them the system will look for an exact match.
Select the artist from the search results and choose their role from the function list on the right. If there isn’t a role that matches, select other and put details in the notes section.
Create a new entry
If your search does not bring up the correct result, enter the name of the artist (first name then surname) and click ok to create a new entry.
If the track has more than one artist
You must enter each name as a separate entry, unless the artists exist as a known brand (rather than a one-off collaboration). Allocate each contributor a performance role from the function list. If there isn’t a role that matches, select other and put details in the notes section.
5. Add composers
Select the People tab and click the + sign on the right-hand side.

Check if they are already listed
Use the search function to check if the composer is already in the system. Search by surname as the naming convention for composers is ‘surname, initial’. For example ‘Michael, J’.
Select the correct result and set the function role to composer.
Create a new entry
If your search does not bring up the correct result, enter the name of the composer and click ok to create a new entry.
Use the to find composer details.
6. Add publishers
Select the MRU tab and use the search function in the publisher field to check if the publisher already exists. If it doesn’t you can create a new one by entering it manually.
If there is no publisher then put Not Given.

Set the MRU status
Amend the MRU status to Ready to report.
7. Add event details
Live music production involves events and sessions. Events have a live public audience whilst sessions do not.
Both events and sessions are categorised within ‘event groups’ and ‘events’. You can find the relevant details for your session or event as well as formats detailed .
Select the Event tab and fill in the Event group, Event and Venue fields.
Use the search function in these fields to check if they are already in the system.
8. Save your Take Data Card
Click ok at the bottom of the interface and your TDC will be saved and added to the store you created it in.
Related tasks
-
![]()
How to create a Take Data Card and add metadata for an individual music track
-
![]()
Use Highlander鈥檚 Genealogy feature to upload audio for your entire programme
Further guidance and training
-
![]()
Click here for more help on Sadie 6 (91热爆 Desktop Certificate required.)
-
![]()
Click here for a selection of short refresher courses. (91热爆 Desktop Certificate required.)


