Music tracks: how to add metadata in Highlander
This guide explains how to create a Take Data Card and complete metadata for an individual music track you want to play. This does not include classical music. See the relevant guidance if you’re uploading or a .
Check if the track already exists
A Take Data Card (TDC) for the track you want to play will often already exist in Highlander. Always check before creating a new one.
Click on the search icon in the top menu bar to search all stores in your workgroup.

You can also search specific stores by selecting them and using the filter option on the top menu bar. To select multiple stores use ctrl + click.

Use the wildcard symbol * before and after your search terms to find tracks that include those terms. Without them the system will look for an exact match.
If a TDC exists for the version of the track you want, drag and drop it into your playlist rather than creating a new one.
Create a new Take Data Card
If you can’t find an existing TDC for the track, create a new one by selecting the store you want it to be created in. Then click on File and New before selecting Music-DIGA.

Where to get metadata
The label should provide you with complete metadata for the track you want to play. If they don’t, you should go back to them and request it.
If it is urgent, get the information you need from an external database.
Search the database by right-clicking on a TDC in the store’s list of items. Select Get Data from external DB from the options.

You can also search the and databases for audio files and metadata. You will need to create accounts using your 91热爆 email address before you can log in.
1. Title your track
Enter the title and if needed add production notes in brackets. The first letter of each word is capitalised. For example:
‘Track Name (Bed)’
‘Track Name (Show Branded)’
‘Track Name (DJ Edit)’
Title for public display
Add a title for public display using the field highlighted in yellow at the bottom of the interface. If the yellow Public Title field is empty then the main Title field will be sent to public display. A single character, for example a full stop, entered in the yellow Public Title field will mean that field is sent to public display.
For technical reasons, don’t use any special characters in the public title field such as accents, < > or [ ]. This is the same for performer and composer entries.
Get your tracks displayed live
Tick the Send data to public display box to ensure your track is displayed on interactive platforms such as Now Playing.

2. Select your programme
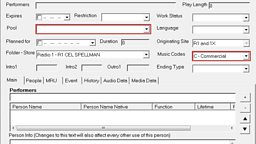
Select your programme from the Pool field.

3. Select the right music code
For the music code field use:
- C for commercial music
- M for production music
- R for all recordings of live performances
- X for specially composed music that is not covered by the above
4. Add performers
Click on the + sign on the right-hand side of the performer field.

Check if they are already listed
Use the search function to check if the performer is already in the system.
Use the wildcard symbol * before and after your search terms to find tracks that include those terms. Without them the system will look for an exact match.
Select the artist from the search results and choose their role from the function list on the right. If there isn’t a role that matches, select other and put details in the notes section.
Create a new entry
If your search does not bring up the correct result, enter the name of the artist (first name then surname) and click ok to create a new entry.
If the track has more than one artist
You must enter each name as a separate entry, unless the artists exist as a known brand (rather than a one-off collaboration).
Using JAY Z and Kanye West’s track ‘Paris’ as an example, JAY Z would be a main artist and Kanye West would be the second main artist.
If you’re unsure check to see if they have an entry at .
Featured artists
Select Featured artist from the function list. A track credited to Drake (feat. Rihanna) would use 'main artist' for Drake and 'featured artist' for Rihanna.
Versus artists
Select Versus artist from the function list. A track credited to DJ Fresh vs Diplo would use 'main artist' for DJ Fresh and 'versus artist' for Diplo.
Remix artists
Select Remix artist from the function list. ‘Circus Bells (Hardfloor Remix)’ by Robert Armani would credit Robert Armani as ‘main artist’, Hardfloor as ‘remix artist’.
Mashups
One artist is chosen as the 'main' artist and other artists are 'versus' artists. The producer who created the mashup should be added as 'remix artist' if known.
5. Add composers
Select the People tab and click the + sign on the right-hand side.

Check if they are already listed
Use the search function to check if the composer is already in the system. Search by surname as the naming convention for composers is ‘surname, initial’. For example ‘Michael, J’.
Put a * symbol before and after your search terms to find tracks that include those terms. Without them the system will look for an exact match.
Select the correct result and make sure the function role is set to composer.
Create a new entry
If your search does not bring up the correct result, enter the name of the composer and click ok to create a new entry.
can help you find composer details.
6. Add the label
Select the MRU tab and use the search function in the label field to check if the label already exists. If it doesn’t you can create a new one by entering it manually.

7. Add the publisher
Select the MRU tab and use the search function in the publisher field to check if the publisher already exists. If it doesn’t you can create a new one by entering it manually.

8. ISRC code
Leave this box empty, unless you have an ISRC code.
DO NOT write ‘Not Given’ in this field.
(Text in this field will stop the track from going to Now Playing)
9. Add the catalogue number
Add the relevant number in the catalogue field. If not known, enter ‘Not Given’.

10. Set the MRU status
Once you have completed the MRU fields, set the MRU status to Ready to report.
11. Save your Take Data Card
Click ok at the bottom of the interface and your TDC will be saved and added to the store you created it in.
Related tasks
-
![]()
Create a Take Data Card and complete metadata for live music tracks
-
![]()
Use Highlander鈥檚 Genealogy feature to upload audio for your entire programme
-
![]()
Editorial guidance on writing titles and descriptions for different platforms
Further guidance and training
-
![]()
Click here for more help on Sadie 6 (91热爆 Desktop Certificate required.)
-
![]()
Click here for a selection of short refresher courses. (91热爆 Desktop Certificate required.)


